Showing posts with label Starters. Show all posts

Saturday, September 01, 2007

Deviled eggs


Deviled eggs are an endangered species. When do you ever see these at a drinks party or on a buffet? It's all tuna tartar served on spoons elegantly arranged on a tray (though eating that tartar in one gulp under the eyes of the waiter eager to retrieve the spoon is not nearly so elegant) and teeny tiny servings of soup and nary an egg in sight. Nothing wrong with tuna and soup but I think those eggs should be brought back in fashion. I for one know lots of people who would love one of these beauties with a chilled glass of wine. And I do, too. I made them just for myself as a simple yet gorgeous nibble/starter the other day.

Deviled eggs (serves 2 as a starter)

  • 2 eggs
  • 3 teaspoons mayonnaise
  • 1 teaspoons smoked paprika
  • salt and white pepper
Boil the eggs for eight minutes. Refresh under cold water, then peel and cut in half. Remove the egg yolks and put them in a bowl. Mash with a fork, then add the mayonnaise and paprika and stir until well combined. Season to taste. Spoon (or pipe if you're that kind of person) the egg yolk mixture back into the hard-boiled eggs and sprinkle with a little more paprika.

Check out deviledeggs.com, a website from someone truly dedicated to the salvation of deviled eggs.

Sunday, May 20, 2007

Asparagus salad with smoked salmon and honey-mustard-vinaigrette


There are some seasonal foods I like so much that I'll have them basically whenever I can and in whatever way. Raspberries are one of these foods. Asparagus are another - green or white, soup, salad, boiled, roasted, with pasta, rice - anything is fine with me. I've tried a myriad of asparagus recipes but this is one I resort to over and over again, it's a simple and classic combination which works every time (I think).

Asparagus salad with smoked salmon and honey-mustard vinaigrette (serves 4)

  • 1 bunch green asparagus (1kg)
  • 1 tablespoon gros-grain mustard
  • 2 teaspoons honey
  • 1 tablespoon balsamic vinegar
  • 2 tablespoons olive oil
  • salt and freshly ground black pepper
  • 4 slices smoked salmon, cut into strips
Wash the asparagus and cut off the woody ends. Cut the asparagus in 5 to 10cm-long pieces. Reserve the tips and steam the stems until just tender. Refresh briefly under cold water. Repeat with the asparagus tips and put stems and tips into a bowl. Stir all the ingredients for the vinaigrette together. Add the salmon strips to the asparagus, then the vinaigrette and stir carefully. Serve immediately.

Tuesday, April 10, 2007

Polpettone di tonno


This is what I made on Good Friday when fish - same as in many other countries - is the traditional dish here. I wanted something that could be prepared in advance and that would go well with the wonderfully warm temperatures so I settled on polpettone di tonno, tuna loaf, something I have been meaning to try for ages. The polpettone is poached and the cooled before serving. I made it according to the recipe in Betty Bossi's Italienische Küche, with slight alterations, and I saw that there is a recipe in Joyce Goldstein's Cucina Ebraica: Flavours of the Italian Jewish Kitchen as well. I served it with a light dip made from fromage frais and basil leaves which I crushed in a pestle and mortar with some sea salt - a little Jamie Oliver trick.

Polpettone di tonno (serves 6-8 as a starter)

  • 390g tuna in brine (drained weight)
  • 100g white bread (only the inner part)
  • 1 dl milk
  • 2 stalks celery, very finely diced
  • 3 eggs, lightly beaten
  • 50g Parmesan
  • 1 bunch flat-leafed parsley, finely chopped
  • 1 bunch chives, chopped
  • 1 garlic clove, minced
  • a little black pepper
  • a hint of nutmeg and cayenne each
Rip the bread into pieces and pour the milk over it. Let stand for a little while, then squeeze out the excess milk. Mash the bread with a fork. Drain the tuna and flake into a bowl. Add the bread, eggs and parmesan and mix well (it's easiest when done by hand). Add the herbs, garlic, celery and seasonings. Mix well. Place a clean tea towel under the cold tap, wring out and lay on the working surface. Form the tuna mixture into a loaf and place in the middle of the towel. Roll up tightly and tie the ends with string. Place the loaf in a large saucepan of simmering water, it must be entirely covered. Simmer for 40 minutes, then remove from the pan and let cool completely before unwrapping and slicing it. It is best served straight from the fridge.

Friday, February 23, 2007

February Salad


Molly from Orangette and Kickpleat from Everybody likes sandwiches both called february a soup month and I couldn't agree more. When the weather is nasty as it was here until recently, cold and rainy, there is nothing like a bowl of hot and tasty soup to restore your spirits. And still, once in a while, I crave salad - crispy leaves, herbs, a tangy vinaigrette - there is something refreshing about it and despite the chilly temperatures, I need refreshment every now and then. The thing is, though, winter isn't the best time for leafy salads in my part of the world. The one salad you can buy in abundance though is chicory, a robust salad which needs a bit of spicing up as far as I am concerned as it can be a little boring on its own. I adapted the classic spinach salad with bacon and avocado to it and it went down a treat with the Boyfriend and me.

February Salad: chicory with bacon and avcado

  • two large handfulls of chicory leaves
  • 1 small handfull of diced bacon
  • 1 avocado
  • a little lemon juice
  • salt and pepper
  • red wine vinegar
  • olive oil
  • mustard
  • chives
Heat a non-stick frying pan over medium heat. Add the bacon and fry until crisp. Peel the avocado, remove the stone, halve and cut into slices. Drizzle with the lemon juice. Mix the salt, pepper, mustard, vinegar and olive oil. Cut the chicory into fine slices and pour the vinaigrette over. Add half of the avocado, half of the bacon and the finely chopped chives and mix thoroughly. Divide between two plates and arrange the rest of the bacon and the avocado on top.

Monday, February 12, 2007

Grana padano flan

Blog-Event XX: Käse
This grana padano flan is my contribution to the cheese event (xx. Blogevent: Käse) hosted by Zorra of kochtopf. The theme is as simple as it is broad: cheese. Makes any Swiss cook's heart sing, of course. My dish is a variation of the Sbrinz flan I made as a starter for a Christmas dinner last year. The use of grana padano convinced me, the flan turned out even smoother than when I used Sbrinz. You could try any mature cheese with a strong, pronounced taste, I think, gruyère would certainly be nice, or mature farmhouse cheddar. This time, I also put little butterfly-shaped pieces of roasted pepper on the bottom of the ramequin dishes - why not try hearts, after all, Valentine's day is just around the corner...


Grana padano flan (makes two small flans)

  • 100g grana padano, freshly grated
  • 2 eggs
  • 60g crème fraîche
  • 0.5 tablespoon flour
  • salt, pepper and nutmeg to taste
  • butter for the greasing the ramequin dishes
  • roasted peppers in oil (optional)
Generously butter two small ramequin dishes. If using, cut two little hearts (or butterflies, pigs, fish, if, like me, you have a strangely large collection of animal shaped cutters) from the roasted peppers. Place firmly in the middle of the dishes, skin-side (if there is any) facing up. Put the eggs into a mixing bowl and whisk vigorously with the crème fraîche. Stir in the grated cheese and the flour. Season the mixture with salt, pepper and nutmeg. Fill into the prepared dishes. Cover with tin foil and place in an ovenproof dish. Pour boiling water into the dish (up to 3/4 of the ramequin dishes' height) and cook on the middle rack of the preheated oven (180°) for about thirty minutes or until the flans are set. Let cool for a few minutes and turn out onto plates or let cool completely to be eaten cold. Serve with spinach or rocket dressed in a tangy vinaigrette.

Sunday, December 31, 2006

Cheese Flan


You may have heard of Sbrinz, a traditional Swiss cheese with a strong but well-balanced flavour and rock-hard texture. Funnily enough, Sbrinz is very actively promoted (you'd think the Swiss knew about it by now - but it seems they don't) and there are often leaflets or booklets with recipes availabe at cheese shops. Many years ago, there was a recipe for a Sbrinz flan which became hugely popular. It was the kind of dish you'd encounter over and over - everybody made it and everybody loved it. I wanted to recreate the dish - a sort of a retro hommage to the good ol' Sbrinz - but now I couldn't find the recipe anywhere. This is what I made up:

Sbrinz flan (serves 4)

  • 200g Sbrinz (substitute with any other aged cheese if Sbrinz isn't available)
  • 3 eggs
  • 120g crème fraîche
  • 1 tablespoon flour
  • salt, pepper and nutmeg to taste
  • butter for the ramequin dishes
Beat the eggs and crème fraîche in a bowl. Grate the cheese and add to the bowl together with the flour. Mix and season with salt, pepper and nutmeg. Fill the mixture into four thoroughly buttered ramequin dishes. I cooked the flans for 18 minutes in an electric steamer (borrowed from my mother - thank you, mom), otherwise cook the flans in a bain-marie in the oven for about 30 minutes or until they are set. Unmold and serve with salad on the side.

AND: HAPPY NEW YEAR!

Monday, December 25, 2006

Because you're worth it


Sometimes someone will tell me they think it's not worth cooking for just oneself. I'm not sure how good I am at hiding how shocked I am at this. Ok, I may not pull out all the stops either, when I eat by myself but once in a while I even might and I think it's always worth making some proper food for yourself - even if it's something very simple. Where do people get this idea? If you take yoga or have a massage, that's probably something you do just for yourself but you'd never think that the time/money invested isn't well spent, do you? To me, it's just the same with food. Even when I lived on my own, I used to cook for myself and I still do now when the Boyfriend isn't around. That doesn't necessarily mean that I slave in the kitchen for hours but I put the same care into cooking as I do when I have company. When I'm feeling a little fancy and want more than one course, I sometimes make myself what I call the russian starter: pickled cucumber with honey and sour cream. I still have some of the real thing I bought in Helsinki but any kind of cucumbers in brine will do.

Russian starter (serves 1)

  • one cucumber in brine, cut into quarters lengthwise
  • 1 teaspoon honey
  • 1 large teaspoon sour cream
Arrange the cucumbers on a small plate and drizzle with the honey. Eat the cucumbers (immediately, as the honey goes hard after a while - some weird reaction to the brine, I suppose) adding a little bit of sour cream to each bite. It may sound funny but do give it a try, it's a delicious combination.

And: MERRY CHRISTMAS!

Monday, December 04, 2006

Carrot Cappucino


If you've conscientiously read all my entries, ("what? You haven't?") you'll know that I am now the proud and happy owner of a small sachet of Dukkah, an egyptian spice mix. I used it for the first time recently and I'm in love. It tastes exotic yet familiar (probably due to the hazelnuts), you have a little taste and your palate is instantly alert with the canny combination of flavours and asks for more. Do I make myself clear? It's a bit like those aromatherapy shower gels which instantly give you a kick when you're half-asleep in the shower.

Carrot Cappucinos (serves 2)

  • 500g carrots, peeled and chopped
  • one tablespoon olive oil
  • 1 small onion, finely chopped
  • a sprinkle of turmeric
  • water
  • on stock-cube
  • salt and pepper
  • a little single cream, whipped
  • 2 teaspoons of Dukkah spice mix
Heat the olive oil in a large pan. Carefully fry the onion until soft. Add the carrots and turmeric and fry for another minute. Add the stock cube and enough water to cover the carrots. Bring to a boil, reduce the heat and simmer until the carrots are soft. Blend until very smooth. Ladle into bowls and put a little whipped cream on top. Sprinkle with the Dukkah (= cappucino effect).

This would be great as an amuse-bouche served in tiny espresso cups if you wan't to impress your guests.

Friday, October 20, 2006

Fancy beets


As you may be aware (or not) stripes are very now. Even the vegetables seem to be following suit - beets come with stripes now! In reality, the funny-looking beets I used in this salad have been around longer than the latest fashion trend, they are an old species called Chioggia, rarely grown nowadays but you may find it on farmers' markets or in specialised shops. I was warned that cooking would slightly blur the colours so I used the stripy fellows raw, making a

Salad of beets, feta and japanese greens (serves 2)

- 1 Chioggia beet, peeled and sliced as thinly as possible
- 2 large handfulls of japanese* greens or other peppery leaves such as rocket or watercress
- 60 g feta cheese
- vinaigrette made of salt, pepper, mustard, balsamic vinegar and olive oil

Dress the salad greens with the vinaigrette and put on the plates. Arrange the beet slices on the salad and crumble the feta cheese on top.

Put on a matching jumper and tuck in.

* Don't ask me whether the salad leaves I used are actually japanese. It's what the tag next to them said anyway. They're extremely aromatic - I love to mix several of them and be surprised with every bite I take. Sadly, I don't think the Boyfriend shares my enthusiasm.

Wednesday, October 18, 2006

Poached salmon pâté


I sometimes used to make smoked salmon pâté, which is a traditional jewish recipe, as far as I know. It is made from smoked salmon (surprise) and cream cheese - very simple, really. While it tastes great, I was never entirely happy with the consistency, smoked salmon (or any fatty fish) having the tendency to turn pasty when pulsed in a food blender. In order to avoid this, I tried to make salmon pâté from fresh salmon, which I poached beforehand. It turned out very nice, chunkier and more rustic, with a fresh taste but not the least bit pasty . The smoky taste goes amiss, however.

Poached salmon pâté (makes a starter for six)

- 300g salmon fillet, without skin
- 1 tablespoon olive oil
- salt and white pepper
- 1 carton cream cheese (125g)
- 1 dash cognac
- lemon juice to taste
- dill (to mix in or as a garnish)

Cut the salmon into bite-sized pieces, dress with the olive oil (I used a lemon-scented one), season with salt and pepper and steam in a steam basket until just done. Let cool a little, then finely mash up with a fork. (I was afraid that if I used the food processor I'd end up with pasty pâté again but it might work - trial and error. The pâté would turn out a lot smoother, of course). Mix with the cream cheese and season with the lemon juice, cognac and salt and pepper. Add the chopped dill if using or garnish with a sprig of dill. Chill for at least two hours. Serve with fresh crusty bread and maybe a salad of mixed green leaves, dressed with a simple vinaigrette.

Tuesday, October 03, 2006

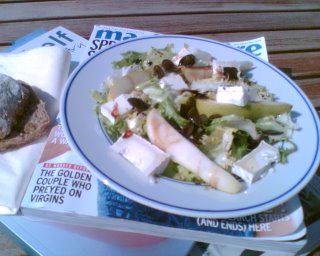
Autumn salad


I love weekends (ahh - surprise!) and over the course of the weekend, I'm especially fond of saturday lunchtime. On a good day, the shopping of groceries, cleaning of apartment etc. has been done and you've got the rest of the day ahead of you. You can go out and do something or, and that's what I opted for last week, you can spend the rest of the afternoon or even the whole day in your (blissfully clean and orderly) apartment. I admit that you need to get up quite early to get everything done until lunchtime. That's ok for me, seeing that I'm always a bit jetlagged due to the fact that I get up very early during the week (or in the middle of the night, as some would say). But you see, that's a good thing, as it means that you will have had breakfast early, even on saturday, and as a consequence you'll be hungry again and in the mood for lunch. Brilliant, isn't it?

Autumn salad (for one)

- some frisée salad (or any other robust, bitter salad greens)
- some crumbly goat cheese, in smallish pieces
- 0.5 small, not too ripe pear, cut into thin slices
- 1 tablespoon olive oil
- 1 tablespoon balsamic vinegar
- 1 tablespoon malaga dessert wine
- a sprinkling of pumpkin seeds

Arrange the salad leaves on a plate, place the pear and goat cheese on top. Put the olive oil, vinegar, dessert wine and pumpkin seeds in a small saucepan and heat slightly. Season with salt and pepper and drizzle over the salad. Serve with fresh, preferably wholewheat bread. I had a wholewheat bun with green olives - perfect.

I find that the frisee's bitterness can be a bit challenging when eaten on its own, but it's perfect when combined with something sweet, plus, its coarsely-textured leaves won't wilt as quickly as other salads when mixed with the warm dressing.

Saturday, September 16, 2006

Kitchen bravery


Last week I did something I had always dreaded and therefore never tempted so far: I used a bain-marie. Until now, whenever I read a recipe requiring that something be cooked in a water-filled dish in the oven, I turned the page of the cookbook and discarded the dish in question as unsuitable for me to make. (For a very long time, I actually felt the same way about cake recipes asking for separating yolks and egg whites and whipping the egg whites - I'm glad to say that I overcame that condition). Lately, I had been dreaming of eating a vegetable flan, which would capture the full-bodied taste of ripe summer vegetables in soft fluffiness. It was clear to me even before I went looking for a recipe that I would make that flan in the bain-marie. I didn't even consider a mousse, no, I wanted the real thing. How come I could suddenly face this technique which I had always tought impossible for me to master? I have no idea, maybe it's yet another step in a mysterious process I go through as I get older until I reach complete kitchen maturity and make my own puff pastry.

I looked at several recipes I found on the internet and combined them to make my very own:

Bell pepper flan with piment d'espelette

- 6 medium-sized peppers (red, orange and yellow)
- 2 eggs
- 100g crème fraîche
- 1 teaspoon piment d'espelette
- salt and pepper to taste
- a little butter for greasing the ramequin dishes

Place the halved and deseeded peppers on a baking tray, skin-side up and roast in the oven (preheated to 200°) for about 30 minutes or until the skins are blackened and blistered. Put the peppers in a freezer-bag and let cool, then peel of the skins. Preheat the oven to 210°. Blend the peppers into a smooth purée, add the egg, crème fraîche and piment d'espelette. Season generously with salt and pepper. Fill the mixture in four little buttered ramequin dishes. Place them in a shallow oven-proof dish and add enough boiling for the dishes to be 3/4-covered. Put in the oven and cook for about 20-30 minutes or until the flans have set. Remove the dishes and let cool. Upturn the flans onto plates and serve.

I served mine with a simple rocket salad and some bread. I was very pleased with the results of my first bain-marie trial. The flans were every bit as light and fluffy as I had imagined and still moist. The taste of the peppers was sweet, with a hint of caramel from the roasting, balanced by the freshness of the sour cream and the strong, smoky flavour of the piment d'espelette. The piment d'espelette really makes this dish special, so go buy some if you have not done so already. Just ignore the price tag, you won't regret it.

The flan-making was a blast (at least in small portions, I might have to wait another few years to tackle the family-size flan). Bain-marie and I shall meet again- soon!

Sunday, September 10, 2006

Turkish delight


The raspberries, which I like to the point of worshipping them, are getting a rarer sight as summer slowly turns into autumn. But I needn't be sad because the figs have arrived! And I love fresh figs almost as much as raspberries. I bought a box of turkish figs the other day. There were about eight of them, fashionably clad in hues of dark purple and each one tucked in its own little paper cup. I like them chopped up as an addition to my muesli in the morning, cut into quarters with a dollop of vanilla-flavoured heavy cream on the side or simply on their own as a snack. Figs, especially fresh ones, are a very unpretentious and uncomplicated kind: they can be served as dessert but they won't complain about being part of a savoury main course or starter. That's the way I like it. So, the other night, wondering about what to do with a half-empty tub of fresh goat cheese, I made

Goat cheese and fig crostini

I cut one fig into eighths, spread some of the goat cheese on little triangles of brown bread, topped each triangle with a piece of fig and placed them in the oven (220°) for about 7 minutes. I served them sprinkled with freshly ground black pepper to accompany a glass of tawny port. The delicate sweetness of the figs and the tangy goat cheese are a wonderful combination. The goat cheese I used was a fresh, cream-cheese-like variety, but I think a more mature kind would work as well. I'll try that next time, maybe using rounds of an aged crottin de chavignol. I might also serve these with drinks as a substantial apéritif replacing a starter (I'd make them slightly bigger in that case). This little "trick" comes in especially handy when time is short and the guests are near - saved by the crostini, so to speak.

Tuesday, August 15, 2006

Eggs in aspic


Over the years, I've come to like aspic and when I read about eggs in aspic on one of my favourite food blogs called Chocolate & Zucchini, I knew that there was a kitchen project waiting for me. I tackled it on sunday, possibly the rainiest day in August, ever.

I started by placing two small dishes (a little bigger than your average individual ramequin dish) in the freezer so that the initial layer of aspic would set quite quickly. I dissolved the aspic powder of two little packets in part hot water, part Noilly Prat (dry vermouth - fabulous for cooking). That made for half a litre of aspic which was too much, but I feared that one packet would not make enough liquid to cover both eggs and it's difficult to juggle the quantities here - too much water and the aspic won't set, too little and it'll set forever. I placed a parsley leaf at the bottom of each dish, then carefully poured in some of the liquid aspic in order to get a layer of about 5mm and put the dishes in the fridge. To make the eggs, I brought a large pan of salted water to a simmer, added a little bit of vinegar, stirred the water with a wooden spoon and let one cracked egg glide into whirl. This way, the egg white will twirl around the yolk and form a lovely round. After about three minutes I lifted the egg from the pan using a slotted spoon and put it into a bowl of cold salted water. Once cooled, I drained it on kitchen paper, cut off some of the fizzly egg white bits and, the aspic in my dishes having set, I carefully placed the egg onto it, together with a tiny slice of ham to keep it company, sprinkled some pink pepper corns over it and covered everything in more aspic. Same thing with the other egg. Back into the fridge, both of them, and wait...

An awful lot of work indeed, and very fiddly, but amply rewarding! I served them on monday night with simply boiled potatoes and a green salad.